


If I want a crystal grid for protection, I keep it simple: pick a clear intention, use a center stone plus support stones, place them in a clean pattern, and reactivate the grid every 7 to 14 days.
A protection grid is just three parts working together: crystals, shape, and focus. I use the center stone for the main aim, support stones to link the layout, and outer stones to mark the edge. For most setups, I place the grid at an entryway, in a bedroom, or in a shared room where stress tends to build up.
Here’s the short version:
- Best stones: Black Tourmaline, Clear Quartz, Amethyst, Smoky Quartz, Black Obsidian, Hematite, Pyrite, Selenite
-
Best shapes:
- Circle for personal space
- Square for doors and corners
- Triangle for work areas (using a workspace protection crystal kit helps)
- Hexagon or star for shared rooms
-
Basic setup:
- Write one short intention
- Put it under the center stone
- Add support stones in an even pattern
- Add an outer ring
- Trace the pattern to activate it
- Simple upkeep: check it every 1 to 2 weeks, cleanse it about once a month, and reset it after tense events
A few practical points matter too. I keep the grid on a flat surface, away from pets, kids, bathrooms, and large electronics. If space is tight, I use tumbled stones. If I want a wearable piece tied to the grid, I place it inside the layout before activation.
Home Protection Crystal Grid Tutorial
sbb-itb-cb05739
Quick comparison
| Grid shape | Best use | Common center stone | Common support stones | Best spot |
|---|---|---|---|---|
| Circle | Personal protection | Amethyst | Hematite, Selenite | Bedroom, meditation area |
| Square | Home boundary | Black Tourmaline | Black Obsidian, Smoky Quartz | Entryway, room corners |
| Triangle | Grounding at work | Black Tourmaline | Smoky Quartz, Selenite rods | Desk, workspace |
| Hexagon / Star | Layered home protection | Clear Quartz or Black Obsidian | Hematite, Pyrite, Selenite | Living room, central area |
Bottom line: I don’t need a big ritual. A short intention, a clean layout, and regular check-ins are enough to keep the practice steady.
Choose your crystals and tools before building the grid
Before you place a single stone, take a minute to look at what you have. That small step makes the setup much smoother.
The main idea is simple: pick stones based on their job in the grid. Some hold the center. Some guide the energy between points. Others help form the outer edge.
Best crystals for protection and where to place them in the grid
| Crystal | Role in Grid | Best Placement | Energetic Quality |
|---|---|---|---|
| Black Tourmaline | Anchor / Grounding | Center or Inner Ring | Absorbs dense energy |
| Clear Quartz | Amplification | Center or Activation Tool | Amplifies intention and surrounding stones |
| Amethyst | Spiritual Protection | Center or Connector Stones | Calming and clarifying |
| Smoky Quartz | Stabilizing | Connector Stones | Transmutes heavy energy |
| Black Obsidian | Clearing / Shielding | Outer Points or Inner Ring | Supports emotional protection |
| Apache Tear | Emotional Clearing | Inner or Outer Ring | Gentle clearing |
| Hematite | Boundary Setting | Outer Ring | Strongly grounding |
| Pyrite | Shielding | Outer Ring | Deflects negative energy |
| Selenite | Purification | Between Stones / Nearby | Keeps energy flowing |
Selenite works well between stones or just beside the grid. It helps keep the layout clear and the energy moving.
Once you've picked your stones and tools, you're ready to clear the space and set a short intention.
Basic tools that make setup easier
You don't need much to get started. The core setup is:
- Your crystals
- A flat surface that won't be disturbed
- A written intention
That intention should be short and direct, like "I am grounded and protected". Write it on a small piece of paper and place it under your center stone. It's a simple way to tie the grid to one clear purpose.
A grid cloth or a preprinted board with a geometric template can make placement easier, especially if you want the layout to feel neat. For activation, many people use a pointed Clear Quartz wand or Selenite wand to trace the links between stones. If you want to keep it simple, your index finger works too.
Working with limited space? Tumbled stones are a good fit. They take up less room and are easier to arrange without crowding the grid.
Candles, incense, or a singing bowl can also help you clear the space and settle your mind before you begin. Nice to have, not required.
Using Conscious Items pieces in your setup
Conscious Items offers ethically sourced crystal jewelry, curated crystal sets, and home accessories made with genuine gemstones. Those pieces can be part of your grid, not just decoration.
You can place them inside the grid or next to it as part of the same protective setup. Each purchase also plants a tree.
Prepare your space, crystals, and intention
Before you build the grid, get the area ready so the protection work has a clear place to land. Pick a flat surface that won't be bumped or moved, like a bedside table, desk, or shelf.
Clear the area and cleanse your crystals
Start with the physical space. Tidy the spot, move clutter out of the way, and open a window if you can. That small step helps the area feel clean and settled before you place anything down.
Then turn to your stones. Use a bell, singing bowl, or even a few claps to cleanse them. If you'd rather keep things low-effort, place your supporting stones on a Selenite plate overnight. That's a simple, passive option. Just skip water and direct sunlight for stones that are porous or prone to fading.
Write a protection intention you can actually use
Write one present-tense intention for the grid. If you want to give it a bit more weight, write it three times. Keep the wording plain and direct:
- For home protection: "This space is calm, clear, and protected."
- For personal boundaries: "I am grounded, protected, and supported."
- For a workspace: "My energy stays steady and protected."
After that, hold your center stone in both hands and focus on the statement for a moment before placing it. Once you've set the intention, put the folded paper under the center stone when you build the grid.
Pick a preparation method that fits your routine
You don't need a big ritual here. Sound cleansing, visualization, breath-focused centering, written intention, or overnight Selenite charging can all work. Pick one method, keep it short, and move into the layout.
If time is tight, one minute of breath-focused centering is enough to help you feel grounded before setup. If you want a bit more structure, pair sound cleansing with a written intention so you're covering both the physical space and the direction of the grid.
Build the grid step by step
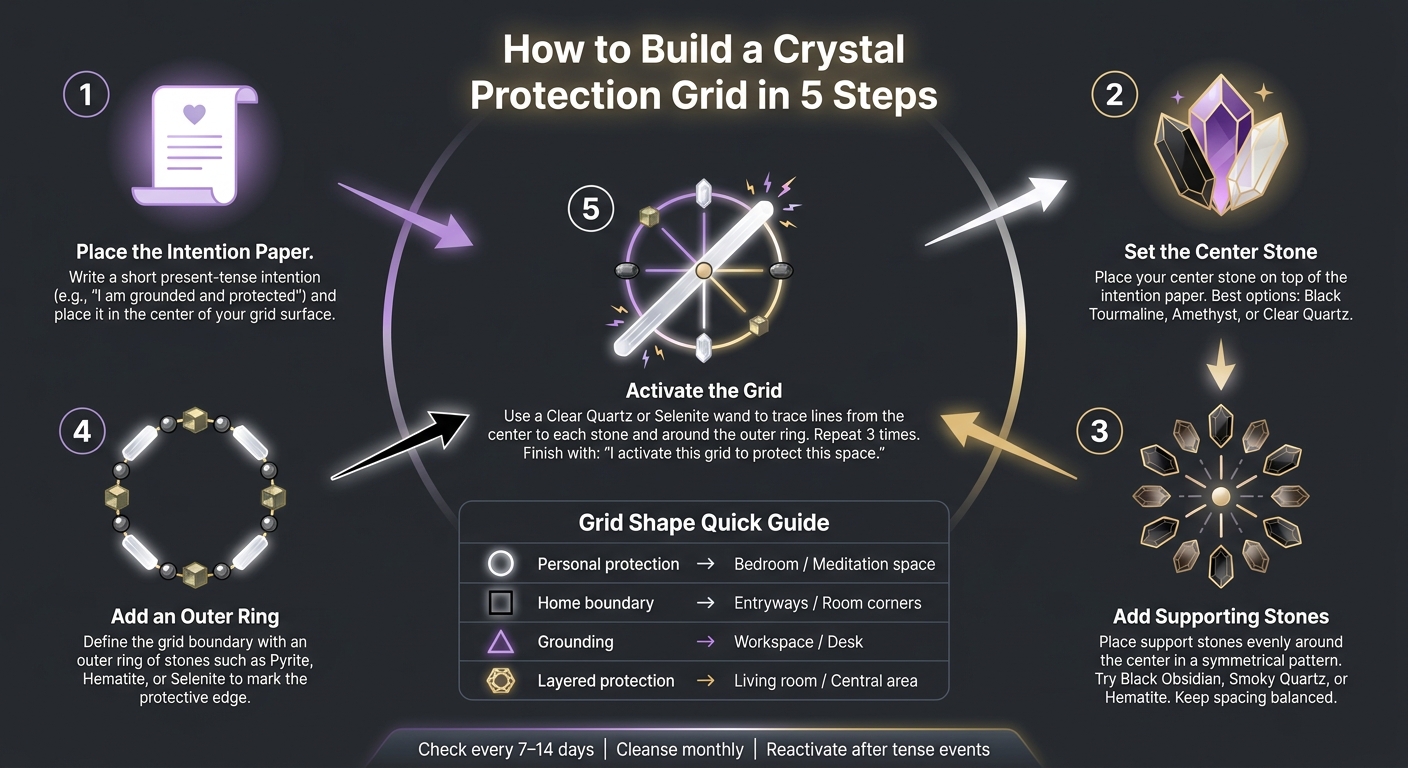
How to Build a Crystal Protection Grid: 5-Step Visual Guide
Match the layout to the space you want to protect. Take your time with this part. Building the grid slowly helps you place each piece with more care, and that placement is part of the practice.
A basic protection grid in 5 steps
- Place the intention paper in the center.
- Set the center stone on top of it.
- Add supporting stones. Place them evenly around the center in a symmetrical layout. Black Obsidian, Smoky Quartz, and Hematite are solid options. Try to keep the spacing even so the grid feels balanced.
- Add an outer ring to define the boundary.
- Check the layout from above. If anything looks slightly off, adjust it. You can use a template or board if that helps you keep the pattern even.
The layout matters because each stone plays a different role in the grid.
Once the stones are in place, pick the pattern that fits the space you want to protect.
Choose the right pattern for personal, home, or entryway protection
- Circle: best for personal protection in a bedroom or meditation space
- Square: best for boundaries at entryways or room corners
- Triangle: best for workspaces or entry points that need grounding
- Hexagon/Star: best for layered protection in a central living area or meditation space
| Grid Type | Center Stone | Support Stones | Best Placement |
|---|---|---|---|
| Circle | Amethyst or Rose Quartz | Hematite, Selenite | Bedroom or meditation space |
| Square | Black Tourmaline | Black Obsidian, Smoky Quartz | Entryways or corners of a room |
| Triangle | Black Tourmaline | Selenite Rods, Smoky Quartz | Workspace or areas requiring grounding |
| Hexagon / Star | Clear Quartz or Black Obsidian | Hematite, Pyrite, Selenite | Central living area or meditation space |
For home protection, place the grid on a stable surface about waist-high. Keep it away from large electronics.
You can also work wearable or decorative crystals into the same layout.
How to include wearable or decorative crystals in the grid
A bracelet or necklace from Conscious Items can sit around the center stone or at the north, south, east, or west point of the grid before activation. Then, when you trace the grid to activate it, include that piece in the same motion so the wearable connects to the protection layout. After that, you can wear it as part of your daily routine.
Large decorative pieces, like a Black Tourmaline tower or Amethyst sphere, can also work as the center stone. In that role, they act as a steady anchor for the grid.
After the layout is complete, activate the grid to connect the stones.
Activate, maintain, and refresh the grid
Activate the grid with tracing, visualization, and affirmation
Once the layout is set, the next step is to activate the grid so the stones work together as one pattern. Start at the center stone and trace a line to each supporting stone, then move around the outer ring. A Clear Quartz point or Selenite wand works well for this. Go over the full pattern three times.
As you trace, picture light moving from stone to stone until the whole grid links up into a protective dome over the space. Then finish with a short affirmation, spoken out loud or said quietly to yourself:
"I activate this grid to protect this space."
Keep the grid maintained without overcomplicating it
After activation, keep the upkeep simple. Leave the grid in place as long as it stays undisturbed. Give the layout a quick check every 7 to 14 days, retrace it for 5 minutes every 1 to 2 weeks, and cleanse it once a month or after intense events.
You can clear the grid without taking it apart. Use sound, smoke, or a Selenite wand. If the grid starts to feel weaker, take that as a cue to refresh it. For a full-moon recharge, place the grid near a window overnight.
A few setup habits help the grid stay in place:
- Keep it on a flat, stable surface.
- Set it away from high-traffic areas, electronics, bathrooms, pets, and children.
When it's time to take the grid down, remove the outer stones first and the center stone last. Then thank the grid before putting the crystals aside for later use. Regular check-ins help keep the protection pattern steady.
Conclusion: Keep the practice simple and consistent
Keep the routine short: activate, check, and refresh. Choose crystals with a clear purpose, build a layout that matches what you want to protect, and stick to a regular schedule. That’s the whole practice.
FAQs
How many crystals do I need to start a protection grid?
There’s no set number of crystals for a protection grid. It comes down to your layout and what you want the grid to do.
If you’re just starting out, 4 to 7 crystals is a simple place to begin. A common setup uses 1 center stone with a few supporting stones around it.
Some people like to keep things minimal. Others prefer 7 to 13 stones for a setup that feels more balanced and active.
What if my grid gets moved or disturbed?
First, turn off the grid. Then cleanse the crystals, put each stone back in its original spot, and turn the grid back on by reconnecting the stones from the center and tracing the lines between them.
If a stone fell, won’t stay in place, or the grid feels dull or heavy, cleanse it and rebuild and reactivate the whole grid. Restate your intention and refresh it when needed.
Can I make a protection grid without a crystal wand?
Yes. If you don’t have a wand or clear quartz point, your index finger works just fine to activate the grid.
Trace invisible lines between the crystals, starting with the center stone and moving outward. That links each piece into your chosen pattern.
